Documentation + User Guide
What has changed through Development
The final implementation of Red’s Daring Rescue is close to the original plan set out. The main difference is that the player is now able to climb walls in addition to the movement mechanics. This started as an unforeseen issue but was then integrated properly into Red’s Daring Rescue as it complimented the already very vertical movement options. Also, in the final product, as well as background music and there are now other sound effects added; specifically, jump and land sounds, button click, and a loop sound. This was so that Red’s Daring Rescue would be more complete audio-wise. However, with these additions, the animation of the player and the custom sprites for the player have been left out. This was because I made all the custom sprites so the frames of animation required would have taken too long to create. Penultimately, there was not enough time to implement a third level like mentioned at the end of the Game Concept Development log. The final change is one to the style of Red’s Daring Rescue. The musical style of the level Green Hill Zone (the first level) is now more akin to Re-Logic’s ‘Terraria’ crossed with The Duffer Brother’s Stranger ‘Things’. The use of continuous arpeggios through the music creates a feeling of moving up and down which compliments the vertical gameplay. The music of the second level (Mirkwood) is now akin to the title screen of Game Freaks ‘Pokemon Platinum Version’. The inspiration of Luigi’s mansion was still kept though and can be found in the background of the level Mirkwood. All these stylistic choices were made so that the music, gameplay, and design of Red’s Daring Rescue were as coherent as possible.
Feedback from Testing
The results from testing were conclusive and extremely helpful for finishing off the development of Red’s Daring Rescue. Feedback on the movement system was almost all to do with it not feeling fast paced enough; the player needed to move faster and drop quicker to feel less ‘slow and floaty’. Moving faster was an easy fix because of how movement was implemented but to drop quicker without reducing jump height, a timer was added that multiplies gravity on the player until they land. This was a suggestion from one of the testers. One comment on the movement was that being able to switch directions instantly was jarring. This was fixed by using force to move the player instead of setting their horizontal velocity. The force is only applied while the player is under a certain speed so that they don’t travel too fast. 86% of testers found that a majority of the game was easy to complete while a few sections required some thought which was intended. However, all testers had played a platformer before with 71% having played over 5 so this may have been due to prior experience. More recent and informal testing has shown that there are a few sections that are quite hard for inexperienced players to complete and that the hints for those areas are not useful. The hints for these areas have been changed to be more direct in what the player should try though the levels themselves have not been changed. The remaining 14% of testers said that the whole game was easy which is preferable over being too hard.
Feedback on the style of Red’s Daring Rescue was mixed. A small majority of 43% said that the background of Level 1 was good while the other 57% were split evenly between indifference and it was too empty. The background has now been filled in a bit more and, from the suggestion of a tester, is now dynamic, gradually scrolling while playing. On Level 2 a larger majority of 57% liked the background while 29% were indifferent. The final percentage of players said it again felt too empty however this has not been changed on Level 2 as more than half the testers liked it. There were two final comments on the style of Red’s Daring Rescue; the terrain on Level 2 seemed to shimmer and that the sprites in general could be higher quality. The shimmer is from how the tile map for Level 2 was coloured, as it was done by hand the slight variations in intensity, amplified by the grey colouring, led to this effect. It doesn’t happen on Level 1 because the ground isn’t grey. The second comment couldn’t be fixed because I was making my own sprites, if I was outsourcing them this would be an issue I would solve. In the additional comments section most were bug reports that have since been fixed but one was a suggestion to add sound effects and music. This is why there was the change from planning to only have background music to having sound effects too.
Asset List
- Arrow_Sprite, this was used on the in-game instructions on the signs
- Background_GreenHillZone, a prefab for the background of Level 1
- Background_Mirkwood, a prefab for the background of Level 2
- Background_Tree1_Level_2, a sprite that was used in the background of Level 2
- Background_Tree2_Level_2, same as above though different design
- Button System, a canvas for UI so it was easier to make all identical
- Checkpoints_Level_1, a prefab for the colliders used as checkpoints on Level 1
- Checkpoints_Level_2, same as above but for Level 2
- Cloud, the sprite that was used in the background of Level 1
- Ending_Ground, a prefab of a small segement of Platforms 2 to be used instead of the whole level in the end cutscene
- Fade_Canvas, a prefab for the canvas that was used for the fade to black at the end of each scene
- GreenHillZone, the background music of Level 1
- HintSystem_Level_1, a prefab for the canvas of hints given in Level 1
- HintSystem_Level_2, same as above but for Level 2
- Instruction, a prefab for the instructional signs on Level 1
- Jump_Sound, the sound used for when the player jumps
- Knock, the sound for the button clicks
- Landing_Sound, the sound for when the player lands
- Loop_Sound, the sound for when the player vertically loops
- Mirkwood, the background music for Level 2
- Physic Materials: - Friction, used on the player for stopping over time
- Frictionless, used on the boundaries of two player mode so they can’t stick to the edge of the screen - Platform Tiles, the tile palette for the tile maps
- Platforms_1, a prefab for the ground of Level 1
- Platforms_2, same as above but for Level 2
- Player 1, a prefab for player 1
- Player 1 End, a prefab for player 1 during the end cutscene so it has much less scripts on it
- Player 2, a prefab for player 2
- Player 2 End, the same as Player 1 End but for player 2
- Prison, a prefab for the goal of Level 2 which also contains the pink ball
- PrisonBroken, a prefab for the prison in the end cutscene which also contains the pink ball
- Restart_Sound, the sound for when the player moves too fast and are respawned
- Scenes: -Ending_Double, the end cutscene when in two player mode
-Ending_Single, the cutscene for when in single player
-Level_1_Double, the first level when in two player mode
-Level_1_Single, same as above but for single player
-Level_2_Double, the second level when in two player mode
-Level_2_Single, same as above but for single player
-Title, the main menu and title screen
- Scripts:
-AudioFade, for fading the music when changing scene
-CheckPointCounter, to allow the player to keep track of their check points
-ConstantJumping, for the end cutscene when all three balls are constantly jumping
-HelpMenu, contains the methods for enabling and disabling the hints
-IgnoreCollision, for player 2 so the players don’t collide
-LevelEndListener, checks for when the player it’s attached to reaches the level end
-PlayAudio, contains the method for the button click sound being played
-PlayerMovement, the script for allowing the attached player to move
-PlayerSoundEffects, a derivation of PlayAudio that plays the jump and land sounds (loop is in vertical wrap and restart is in respawn)
-QuitGame, for quitting the game and not for quitting the level
-Respawn, respawns the player when they are moving too fast
-SceneSwitcher, used by the quit level buttons and the title screen to switch scene
-Scrolling, for making the background of Level 1 move on its own
-TimedSceneSwitch, a derivation of SceneSwitcher used to make the end cutscene only last a certain amount of time
-Utils, to get the boundaries pf the screen which is used for VerticalWrap
-VerticalWrap, a derivation of the WrapAround script form tutorials that allows the looping mechanic
- Sign_Sprite, used for all the signs and the UI
- TargetGroup, a prefab for two player mode to aim the camera at both players
- Tilemaps, the folder that contains all the sprites for the tilemaps
- Title Card, the title card of the title screen
- Victory_Remastered, the second try at a victory tune for the end cutscene
User Guide
Note: Most of Red’s Daring Rescue is quite easy to solve and I advise even if you are stuck to get out yourself. That combined with the hints mean that this shouldn’t be needed; but it’s still here.
The controls are outlined in the first level on the two signs at the beginning. They say, for player 1, use ‘W’ to move upwards, ‘A’ and ‘D’ to move left and right respectively and ‘S’ to move down. For the second player, use the arrow keys in the same configuration.
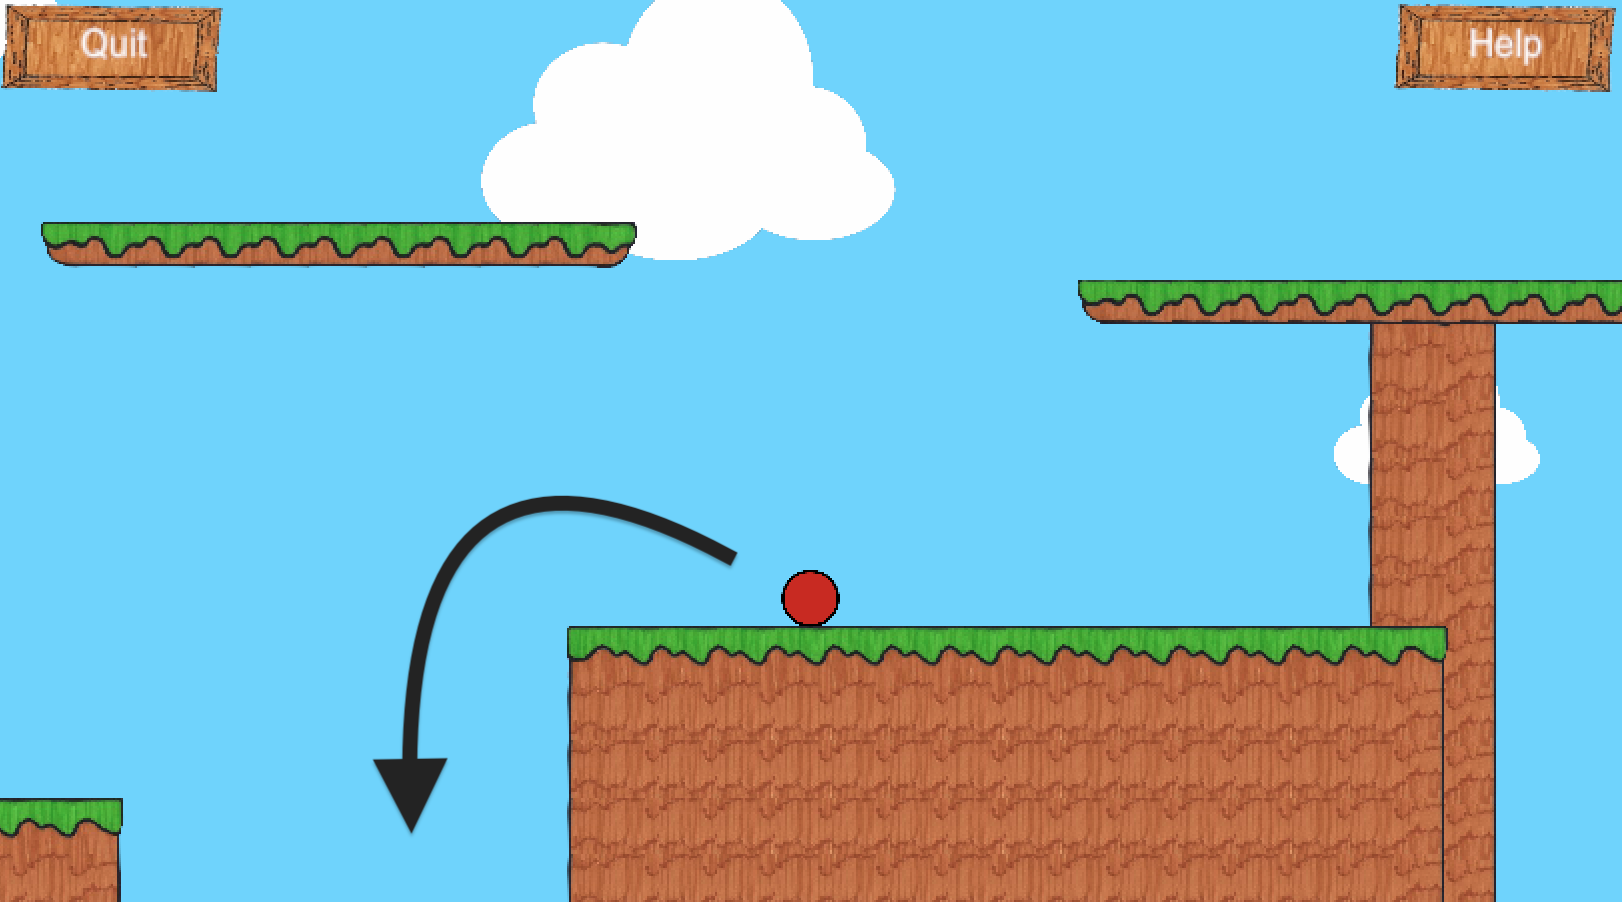
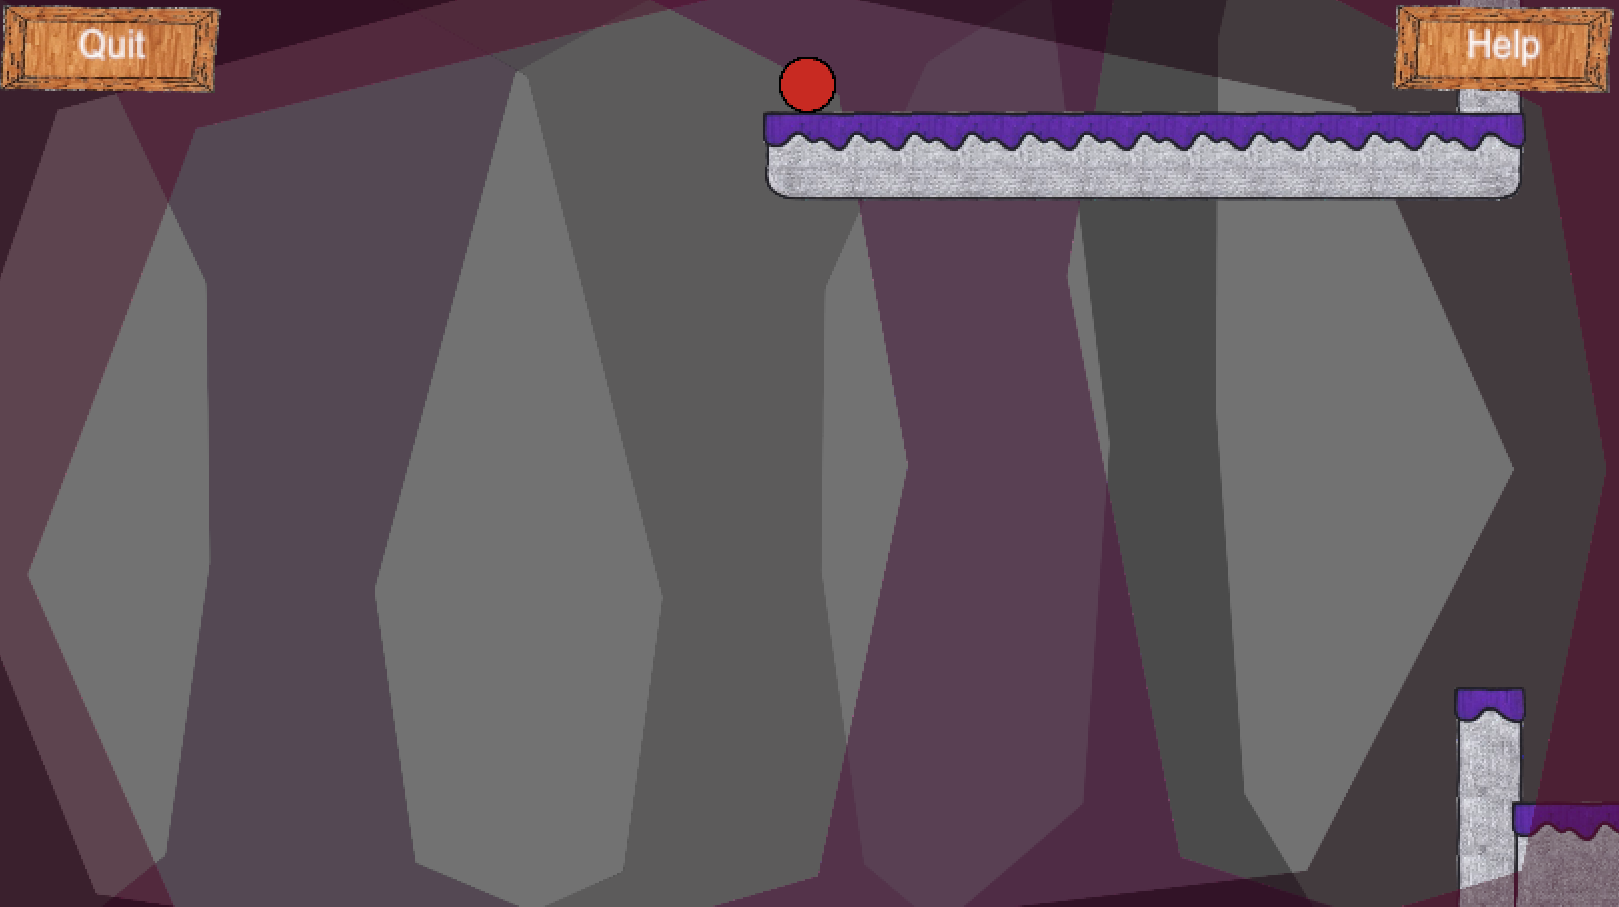
The first hard puzzle, in my mind, is the one pictured because the user is not yet accustomed to looping. Getting your mind around looping is the hardest part. All that is needed is to drop down the hole. The section of ground the player is on in the above picture is to throw the user off. 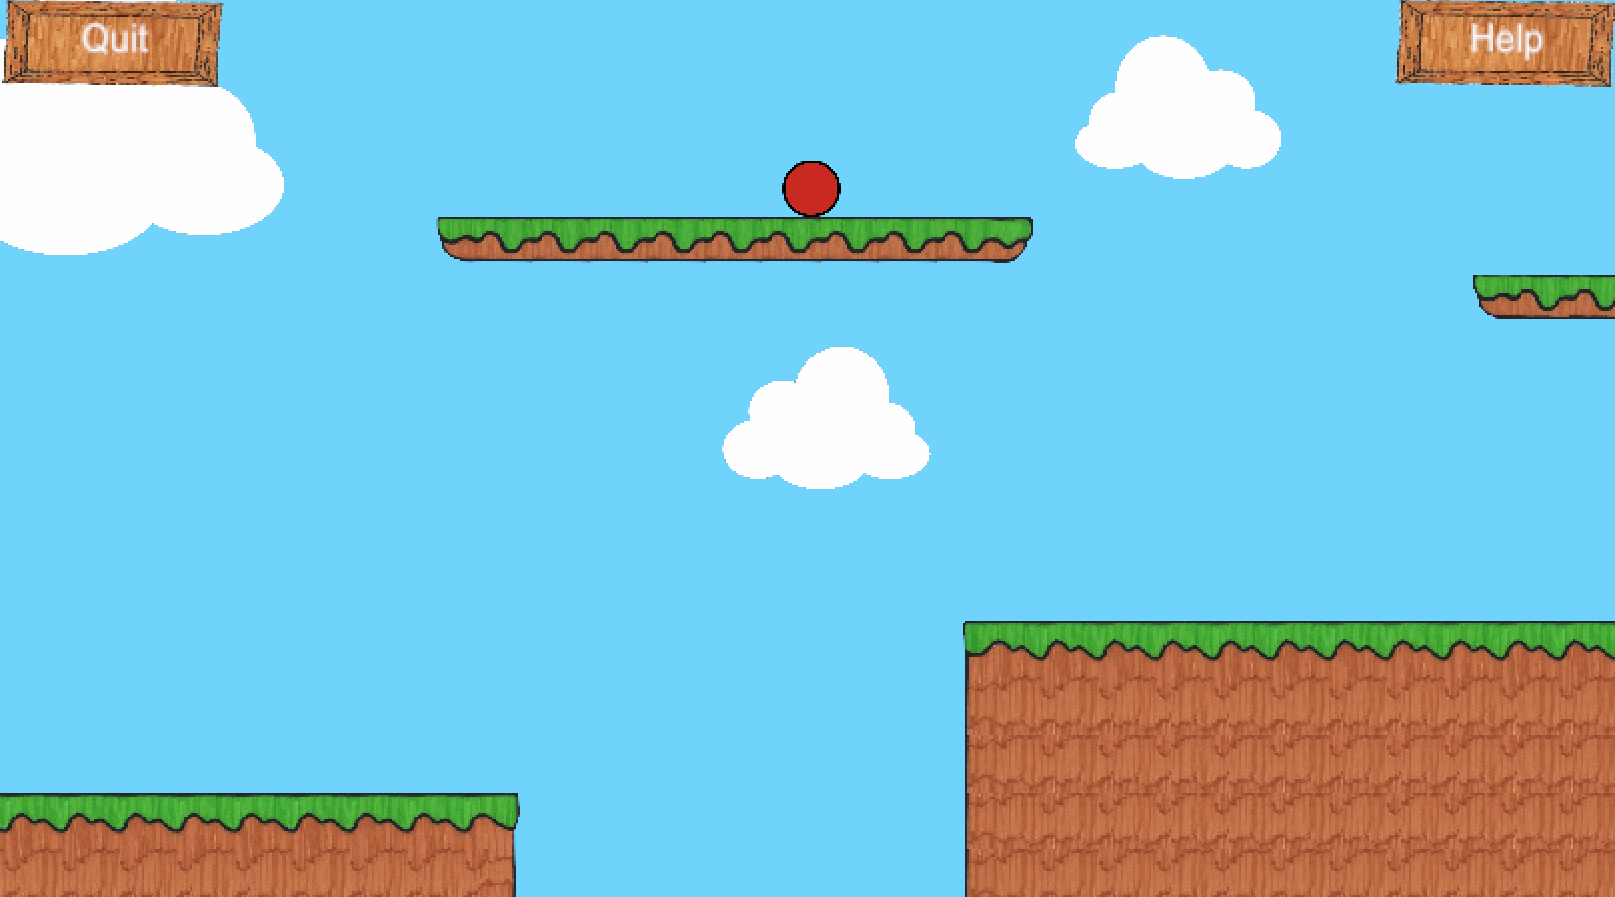
After dropping down the hole you should be on the platform as pictured above. From there, with a run up, the jump to the next stage should be easy enough.

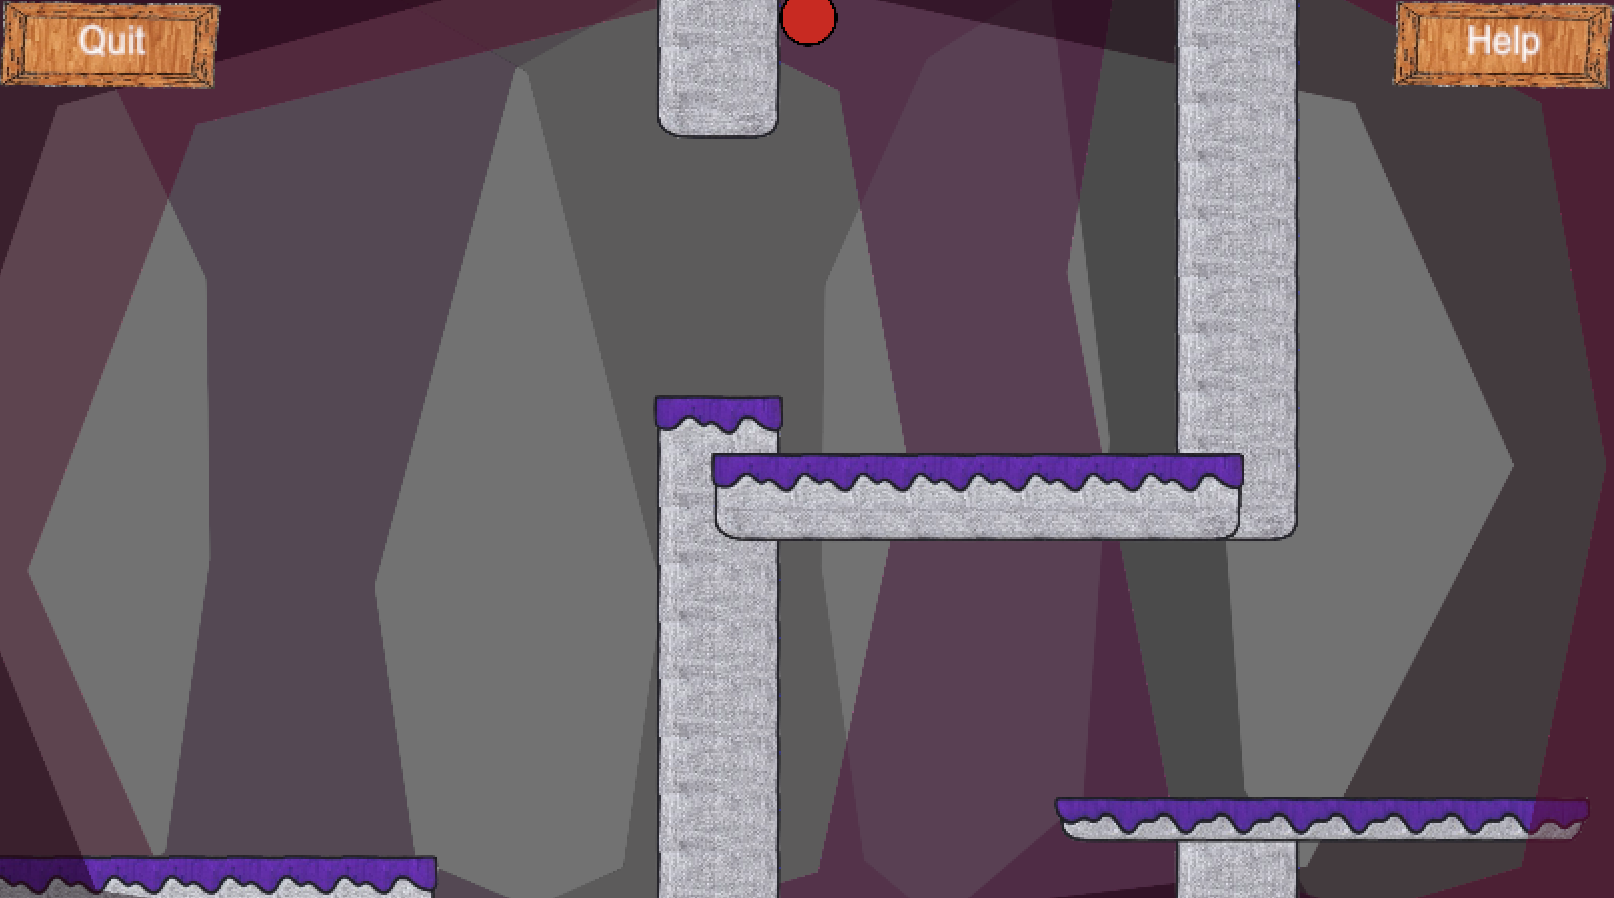
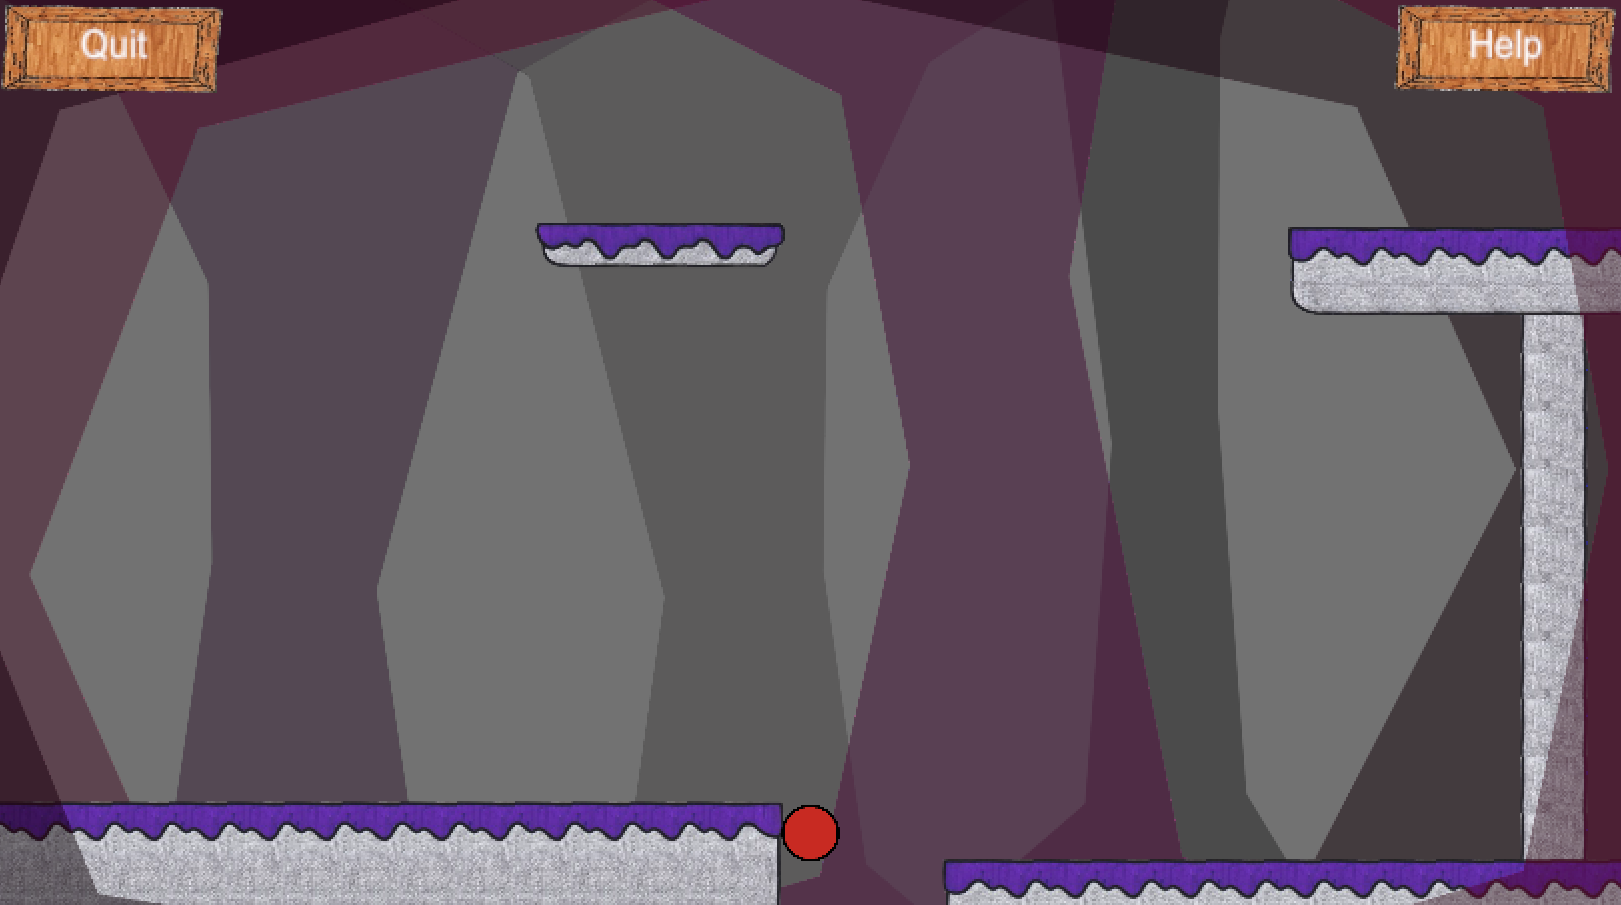
The second spot most users have gotten stuck is with the wall jumping in the section pictured above. To pass this part, get to the position pictured then simply hold ‘W’ and ‘A’ to jump to the hanging section. For second player, use the Up and Left arrows.
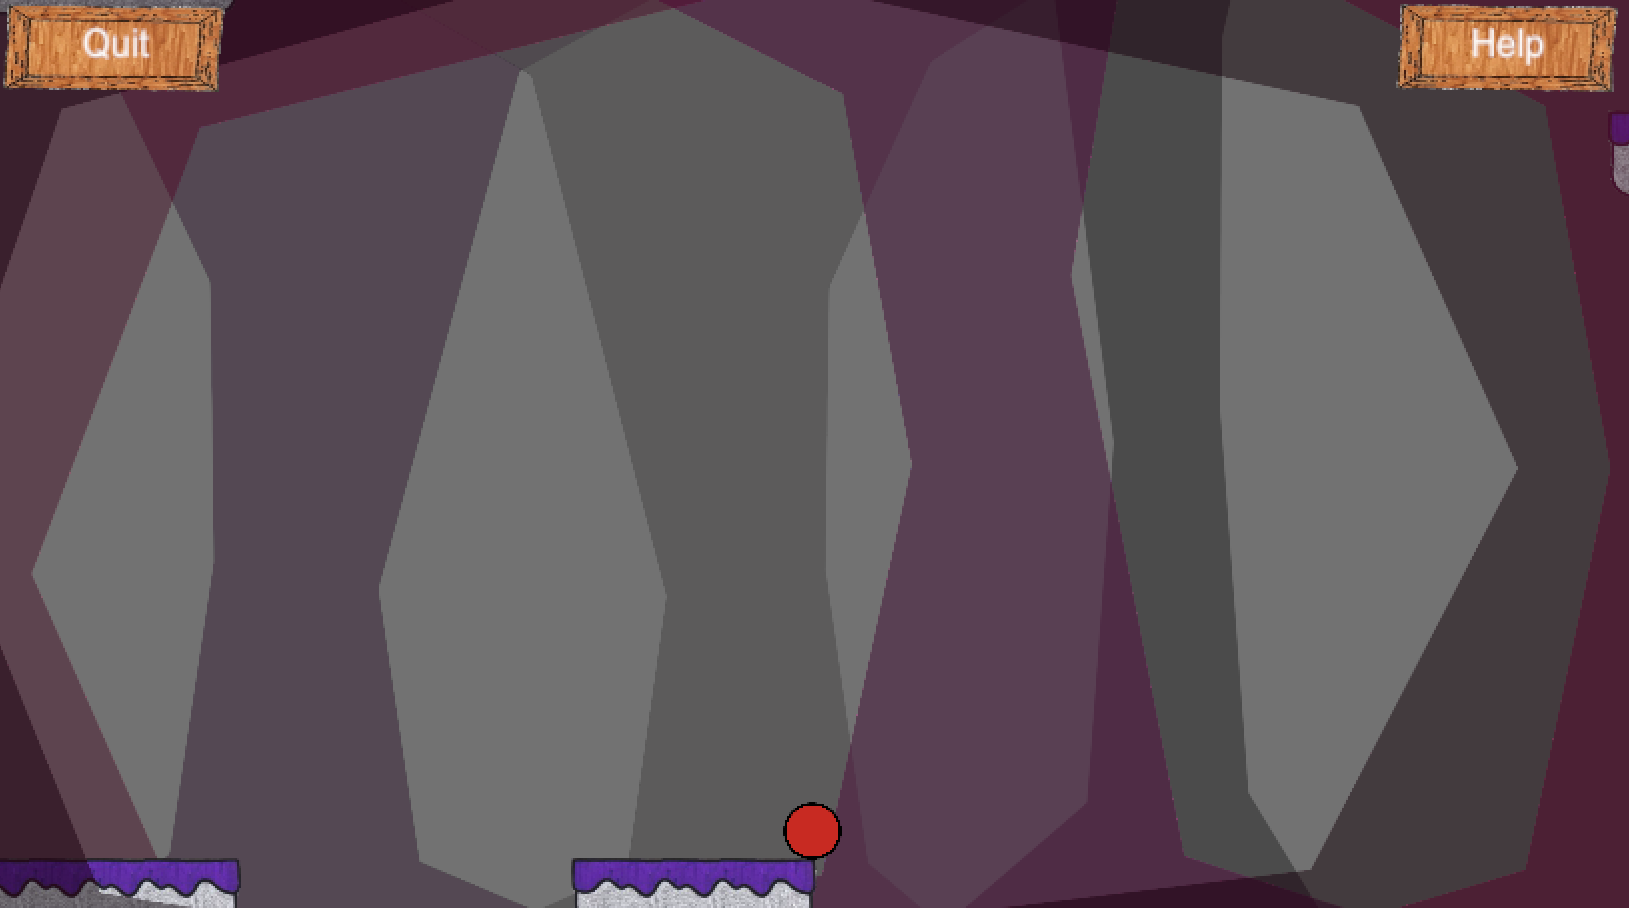
After this you should find yourself in the position pictured above. All that is left is to climb the wall until you loop to the bottom, then repeat the wall jump but with ‘D’ instead of ‘A’. For second player, use the right arrow instead of the left.
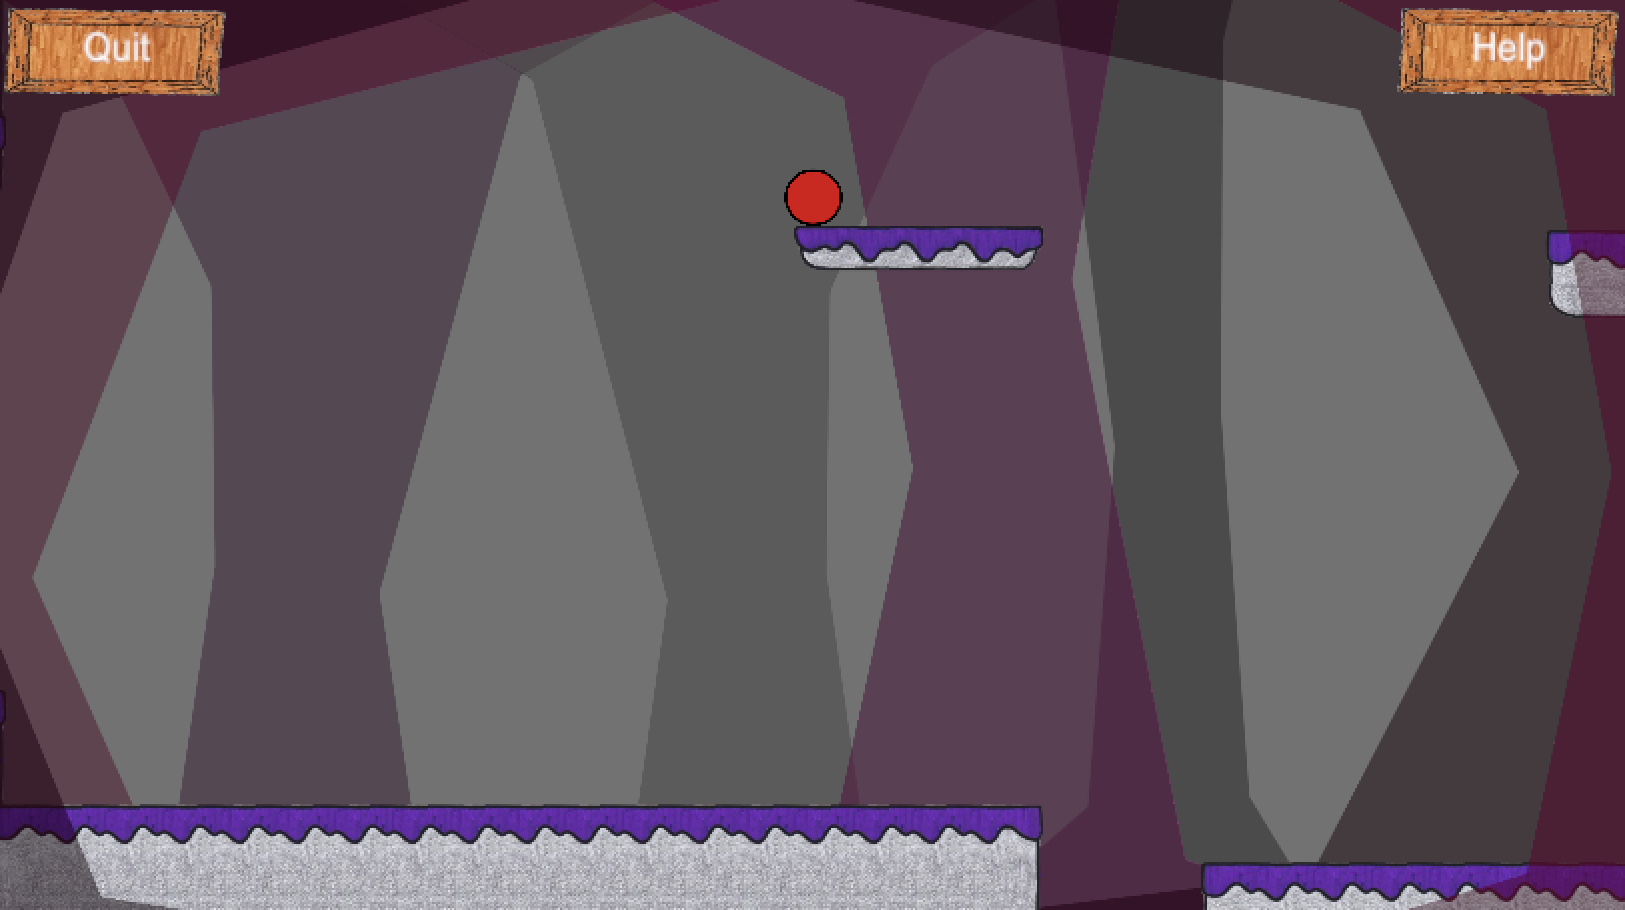
Two parts of the jump pictured above make it hard. First you can barely see where you need to land; the platform sticking slightly out from under the help button. Secondly, if you jump too early you will gain too much speed and force a reset. All that is need is to, with a run up because of force based movement, jump from where the player is pictured above.
If timed well you will land where now pictured above. There is the possibility that you will stick to the side of the landing platform and so all you need to do is climb the ledge to the platform proper.
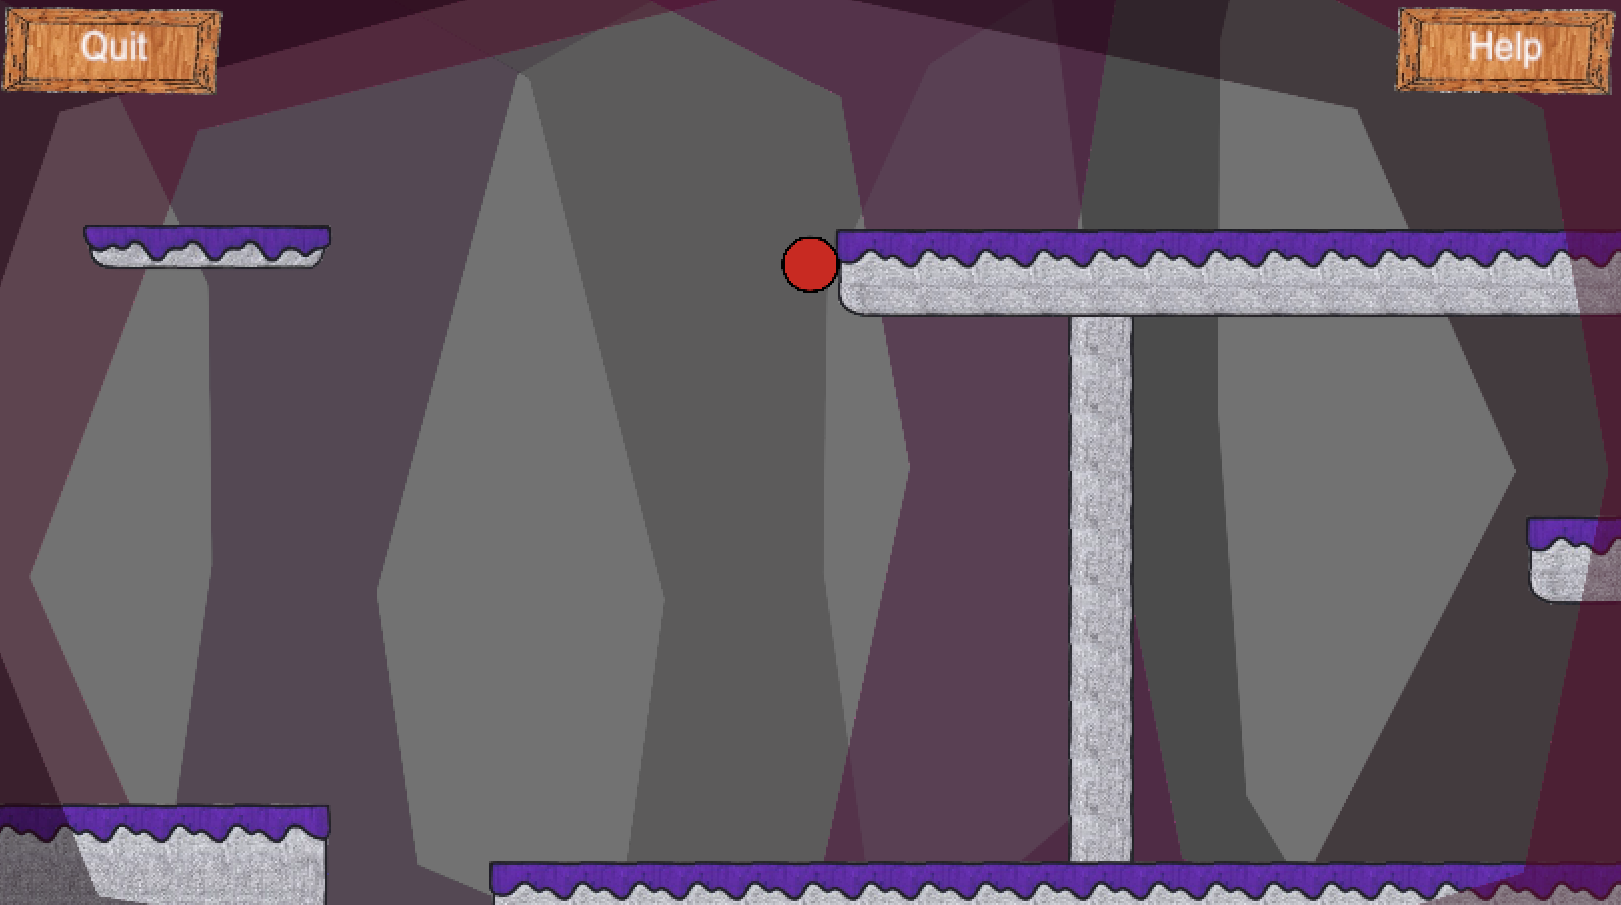
The final hard section is the one pictured above. It is the hardest part of Red’s Daring Rescue. To get to the jump platform, position yourself in the spot pictured above then move down and left at the same time.
Once successfully on the platform as pictured above, move the left most edge to maximise the run up you get, it is needed. Do not jump left then switch back to moving right in mid-air. You may think that this lengthens your run up; however, the landing will reduce your speed just enough so that you won’t make the jump no matter how close to the edge of the jump platform you jump.
You are not necessarily aiming to land on top of the platform; it is more likely you will land as pictured above. Then simply climb up the small ledge to continue on. This jump will likely require a few tries even if you know how to do it because it is so tight.
Leave a comment
Log in with itch.io to leave a comment.